Tutorial – DIY Chandelier/Pendant Lamp from Coffee Filters

Hello, dear friends!!! I’ve been looking for an inexpensive light fixture to replace the existing one in our dining room because it does not tie in with the overall theme (flowers) of our living space. Plus, I need something to tie in with that bold, graphic painting-slash-clock with lilies that are of pink and violet hues.  I decided to DIM (do it myself tee-hee) because the things I loved were so expensive.  So, I looked for inspiration in the net.  There are many instructional blogs and videos on how to make this DIY chandelier/pendant lamp from coffee filters. But I was particularly inspired by a DIY video by fashion and design blogger, ThatGirlCathy. Check it out!

I decided to make some enhancements and experimented on adding color. Here are the instructions.

Materials:

You need an assistant of course. That’s Gustav, my red Russian bear. :-p  Then you need the ff:

1.  Paper Lantern – For this one, I bought the one with a 12″ diameter. Note that your finished product will be almost double the size of the original paper lantern.

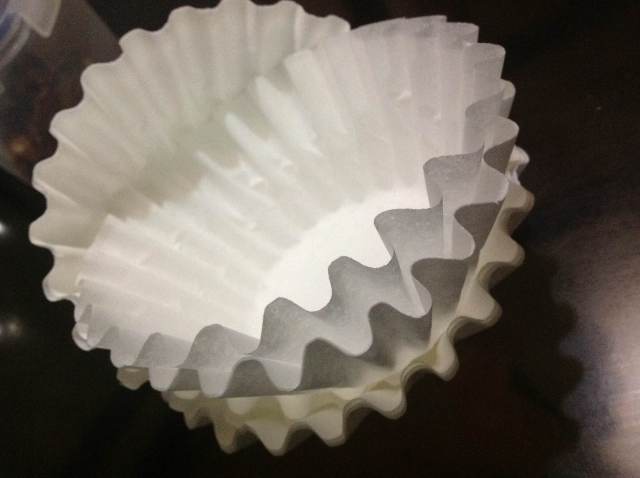
2.  Coffee Filters – I bought a pack of coffee filters that contained 200pcs for only Php 110 at Shopwise. I was able to use them all up for this.  Note that there are cone-shaped coffee filters. We want the basket-type for its crimped edges.

3. Poster Paint an

d Small Brush – The poster paint is available at any bookstore. It cost only Php 33. For this project, I decided to go with a deep violet color.

4. Glue Gun and Glue Sticks – I started using the larger glue gun but I found it was harder to manipulate it so I decided to shift to using the smaller one.

5. Bowl – You will be surprised how valuable this soup bowl will be. 🙂

INSTRUCTIONS

1. Separate the coffee filters one by one and loosely arrange them in a new stack. We need to prepare the filters for painting. If you paint it straight out of the pack, when it dries, it might stick together and will rip when try to start working with it. If you will not paint it, then there’s no need to do this step.

2.  Assemble/Expand the paper lantern. Gustav did a fine job. There are instructions on the package itself.

3.  It’s time to paint the color filters.  Pour in about a teaspoon of poster paint into any disposable deep dish (e.g. used butter container). Pour in 3 tbsps of water. The idea is to dilute the thickness of the poster paint. Divide your loosely stacked, separated coffee filters into 4 batches. Set the stack on a metal sheet or used newspaper bed.  Dip your brush into the paint-water mixture and brush it on the stack of coffee filters, brushing only the tips. It will look like this:

It would look a little messy but when you work with the individual coffee filters, it will looked like the tips are slightly kissed with color. 🙂  You can use any color you would want and adjust intensity of the color. A friend suggested using green which I think would turn out like green hydrangeas.  Here’s a little physics for you:  you can make you brush wetter when putting on the paint, the filter will absorb it up to a third of the coffee filter–a phenomenon called capillary action. ;-p

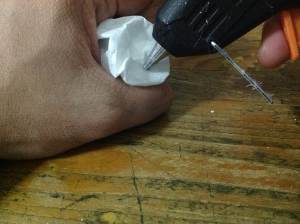
4.  Once it’s dry, you now start working with the “petals.”  You take out a coffee filter from the stack. Squish it in your palm then squeeze the paper to achieve a flower form like so:

5.  Flip it over and flatten the back to make it easier to put glue on. See illustration:

6. Stick it on the lantern, leaving approximately 2 inches of space from the edge of the top opening (where the hook is). Repeat the process, working horizontally around. One of the tips I got from ThatGirlCathy is you need to leave enough space between filters, approximately an inch. If you place it too close, the light won’t shine through. If its too far apart, your petals will open up like crazy crumpled tissue. Just eyeball it as you go along. When you are ready to fill up the second layer, try sticking it in between the spaces from the first layer. Repeat the process until you reach just about two inches away from the edge of the bottom opening. Here’s a tip:  remember the bowl? When working with the lantern, put it in the bowl for support. This way, your lantern won’t roll over!

7. It’s now time to cover the top and the bottom. You start with taking a coffee filter and folding it in half to form a fan, like so:

Fold it again in half, across to form a fluffier fan. Then fold the pointed tip inward to create a small triangle, like so:

Put some glue on the triangle and stick it at the edge of the opening (not too close), with the fold pointing towards the body of the lantern. This will be covered later on. See illustration:

Repeat the process until you cover the edge of the opening. I was able to use 4 coffee filters around the edge.

8.  After sticking the petals on the edge of the top and bottom opening, fill up the spaces by repeating steps 4-6 until it is fully covered. See this shot of the bottom of the lantern. Note that the different approach in sticking the petals on the edges of the opening is not noticeable anymore.

9.  Okay it’s time to put in the light. You can buy a kit from the hardware store and put it up yourself–IF you can do it. Be safe. Me? I had someone put it up for me. Hahahaha! Okay, about the what wattage to use. The lantern comes with a table of recommended wattage of bulbs to use based on diameter (see below). I used 50 watts. But I think it will be based on intention and preference. If this is an accent light, go lower wattage to make it dimmer.

The final product…as viewed against our espresso wallpaper, the yellow wall, and against the living room. The fourth picture shows how it looks when lit at night.

Hope this helps, dears! Hugs and kisses to all of you!

Posted in DIY | Tagged , , | 2 Comments

I PROTEST!!! – Stop Cyber Martial Law!

Posted in My Life | Leave a comment

Going (Semi-)Vegetarian

Since I am back on my low-salt, low-fat intake and I am now in maintenance medication for hypertension, I kinda veered away from meat and have been digging vegetarian dishes.  I find the vegetarian lifestyle rewarding and cool at the same time. Rewarding because believe it or not, I do feel a “difference” when I eat meatless dishes as compared to when I [savagely] devour pork, beef, chicken with all the fat. But I still drool.  In this case, it is very difficult.  I love to cook and I miss meat…and the flavor of fat. One time, my office mates bought tons and tons of chicharon (deep-fried, popped pork skin with meat) and the smell of it just made me want to die. I have to be contented with the smell…and sight of seeing them dip the chicharon in vinegar with garlic and chili. (wipes drool).

Another challenge is preparing meals every morning and cooking two dishes every weekend.  I bring lunch to office because the cafeteria is not friendly to vegetarians and those who are watching their weight and cholesterol levels. Although I miss their binagoongang baboy with all the fat and oil (uuuggghhh).  Weekends also mean an extra effort since my mom and H and the help love my cooking. So I end up cooking for them and preparing a separate meal for myself. Just like this one.

I took a can of red kidney beans, a small can of mushrooms, a can of pimientos, and 4 cups of white corn kernels, divided them into two and prepared chili con carne for my mom and a low fat, no salt, no meat dish.  One time, I prepared afritadang baboy and I had roasted chicken caesar salad with wheat fusilli ala pomodoro.  It is difficult to watch others savor the fat and oil and patis goodness.

However, it pays to know how to cook and bring in lots of different flavors to breathe new life to vegetable dishes.  Knowledge about herbs and spices turn boring vegetable dishes into yummy feasts. It is true what they say: you can still enjoy food, be healthy, but not lose the gastronomic excitement that different flavors bring. Hence, I am slowly evolving from “getting used to” into “loving” being semi-vegetarian and I am looking forward to the day that i will be 100% vegetarian.

To all my readers, don’t worry. I will still share recipes…both meat-based with all the yummy goodness of salt and fat (tee-hee) and semi-vegetarian and vegetarian dishes.

Cheers to a spiced up [vegetarian] life! Visit my food blog:  aspiceduplife.wordpress.com

Posted in My Life | 1 Comment

Christmas Tree 2011 Concept – Autumn Pink Christmas!!!

Last year, it was gold. This year, it is autumn pink! A little back story of how the tree turned out.  I was gunning for fluorescent pink. But when I sprayed my tree–which was pine green–the tree turned out to be a deep, warm pink: autumn pink to be particular. It is one of those happy mistakes that you encounter in life! And the tree is absolutely fabulous!  Here it is, friends! Hope you share yours too. 🙂

Posted in My Life, Personal | 4 Comments

Facing Mortality and the Mystery of Death

Death. A subject that some, if not most people dread discussing due to its morbidity. It is interesting how different people think of or approach death as a concept—death as the end of life, death as the beginning of life, death being part of life, and death as a bridge to rebirth.  To explore death in terms of its impact on one’s life brings forth a tapestry of colourful and dark patches that provokes thought about death.  Death from the perspective of the dying, from those left behind, and from the medical and spiritual fields make the concept of death profoundly fascinating and/or disturbing.  Some romanticize it, some view it as extremely tragic, and some exaggerate it to a level of macabre.  No matter how death is viewed, the mystique attached to it perpetually fuels the fascination and trepidation over it.

I just finished watching THE FOUNTAIN (2006), starring Hugh Jackman and Rachel Weisz, written (with Ari Handel) and directed by Darren Aronofsky (Black Swan).  It primarily explores mortality and how love pushes one to face it. I particularly love the treatment in both writing and cinematography.  It is told in a non-linear fashion with three different stories from three different periods in time, something that is quite interesting especially how Aronofsky managed to achieve convergence and create unification.  As for the cinematography, Aronofsky teams up with Matthew Libatique (fellow Filipino, later re-teamed with Aronofsky for Black Swan) to mount shots of wonderful symmetry, extreme macro shots, and resonating visual motifs from each periods of time that aided in sustaining interrelationships of the three storylines.  Aronofsky also exhibited mastery of the externalization of the psyche, taking the audience into the minds of the central characters played by Jackman and Weisz.  One constant symbol in the entire film is the tree that appears in the three storylines. While it is presented as the tree of life, the context of its existence ranged from historical, spiritual, medical, to supra-natural—embracing the broad spectrum of perceptions about death and breaks the boundaries of science and religion with its ambiguous imagery.

Overall, the combination of non-traditional storytelling and exquisite (but sometimes over-indulgent) cinematography contributes to eliciting a response that relies heavily on the individual’s perception of and experience on facing mortality.  The film may (or will), to a certain degree, provoke you to feel sad, angry, happy, relieved, resigned, hopeful, and even bored depending on your perceptions of and life experiences in confronting death.  But generally, it hinges on the general mystery of death—what it is, what happens after it, and how does one cope with it.

Posted in Bridget Recommends | Leave a comment